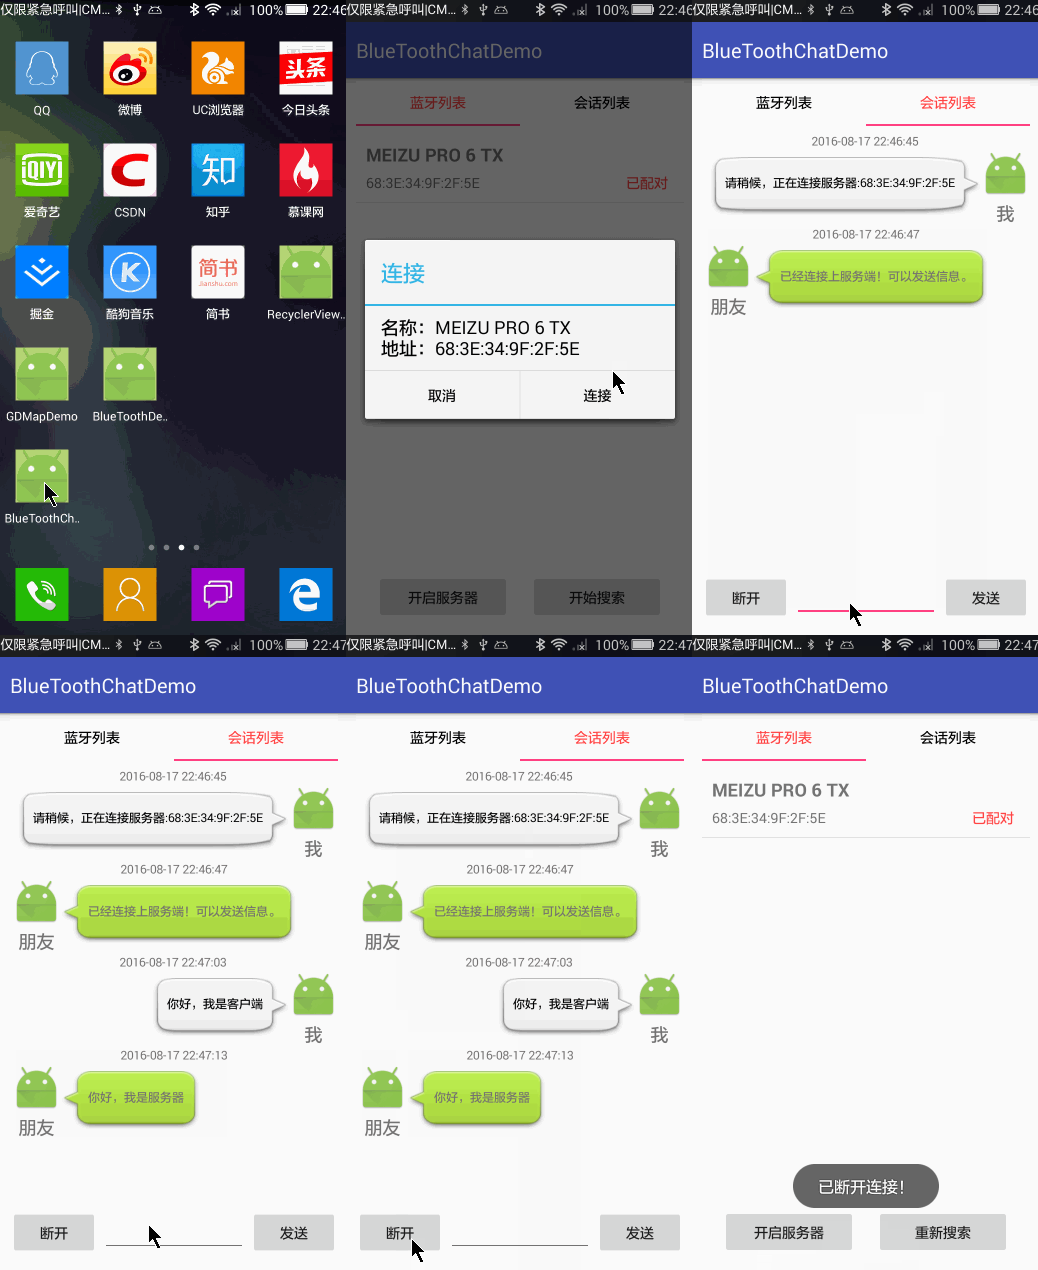
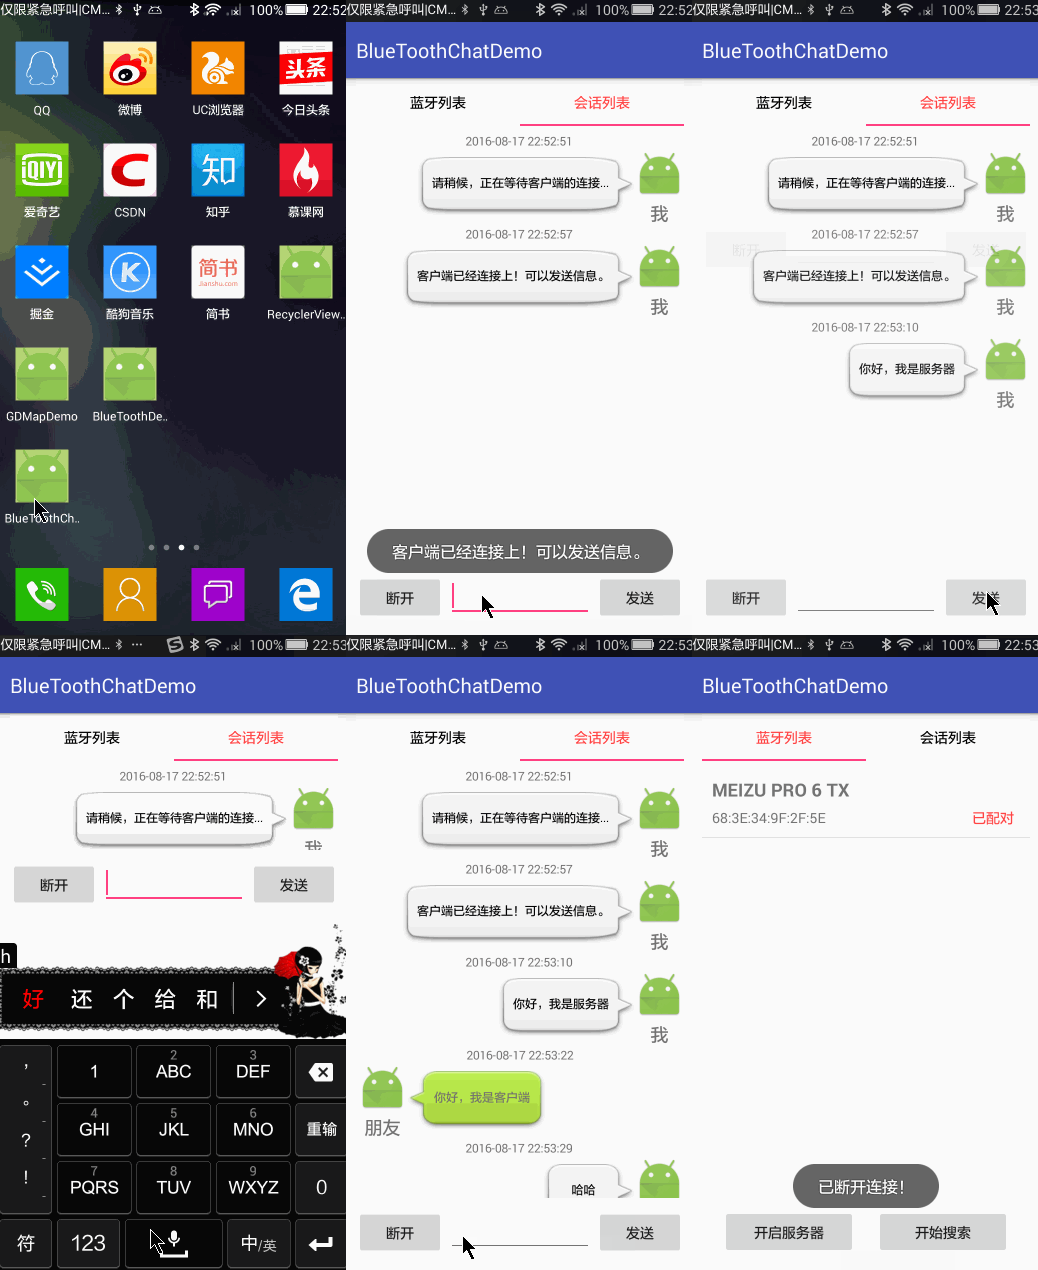
目前,市场上的大部分手机都带有蓝牙,尽管使用的不多,但作为开发者,我们还有必要了解其原理。最近的项目需要用到蓝牙技术,于是写了个 蓝牙的聊天小demo。
1. 效果示意图
这里需要两部手机进行测试。其中一部作为蓝牙服务器,另一部作为蓝牙客户端,进行通信。
客户端截图:
服务器截图:
2.开发步骤
- 开启蓝牙;
- 搜索蓝牙设备;
- 创建蓝牙socket,读取输出流;
- 读取和写入数据;
- 关闭连接和蓝牙。
3.具体的实现
3.1 开启蓝牙
首先获取蓝牙适配器,若存在蓝牙未开则打开蓝牙,如下代码:
BluetoothAdapter mBluetoothAdapter = BluetoothAdapter.getDefaultAdapter();
        if (mBluetoothAdapter == null) {
            Toast.makeText(getActivity(), "无蓝牙功能", Toast.LENGTH_SHORT).show();
        } else {
            if (!mBluetoothAdapter.isEnabled()) {
                Intent enableBtIntent = new Intent(BluetoothAdapter.ACTION_REQUEST_ENABLE);
                startActivityForResult(enableBtIntent, REQUEST_ENABLE_BT);
            }
        }
3.2 搜索蓝牙
首先开启蓝牙搜索功能,然后通过注册广播,搜索蓝牙设备,搜索完成后将其加入到蓝牙列表。
搜索蓝牙:
if (mBluetoothAdapter.isDiscovering()) {
    mBluetoothAdapter.cancelDiscovery();
    mBtnStartSearch.setText("重新搜索");
} else {
    mDatas.clear();
    mAdapter.notifyDataSetChanged();
    //添加设备信息到列表
    init();
}
mBluetoothAdapter.startDiscovery();
mBtnStartSearch.setText("ֹͣ停止搜索");
注册蓝牙广播:
/**
     * 搜索设备广播
     */
private final BroadcastReceiver mReceiver = new BroadcastReceiver() {
    @Override
    public void onReceive(Context context, Intent intent) {
        String action = intent.getAction();

        if (BluetoothDevice.ACTION_FOUND.equals(action)) {
            // 获得设备信息
            BluetoothDevice device = intent.getParcelableExtra(BluetoothDevice.EXTRA_DEVICE);
            // 绑定的状态不一样则进行添加
            if (device.getBondState() != BluetoothDevice.BOND_BONDED) {
                mDatas.add(new BtInfo(device.getName(), device.getAddress(), false));
                mAdapter.notifyDataSetChanged();
                mListView.setSelection(mDatas.size() - 1);
            }
            // 搜索完成
        } else if (BluetoothAdapter.ACTION_DISCOVERY_FINISHED.equals(action)) {
            if (mListView.getCount() == 0) {
                Toast.makeText(context, "没有发现设备!", Toast.LENGTH_SHORT).show();
            }
            mBtnStartSearch.setText("重新搜索");
        }

    }
};

 /**
 * 注册广播
 */
private void registerBroadcast() {
    //设备被发现广播
    IntentFilter discoveryFilter = new IntentFilter(BluetoothDevice.ACTION_FOUND);
    getActivity().registerReceiver(mReceiver, discoveryFilter);

    // 设备发现完成
    IntentFilter foundFilter = new IntentFilter(BluetoothAdapter.ACTION_DISCOVERY_FINISHED);
    getActivity().registerReceiver(mReceiver, foundFilter);
}
3.3 连接蓝牙设备
这里,使用listview展示蓝牙列表信息,item 的点击事件即为连接相应的蓝牙设备,点击某一项后跳转到会话页面,并通知他刷新信息,为方便,这里使用了EventBus来订阅事件,避免使用接口,如下listview 的item 的点击事件:
//列表item设置监听,
mListView.setOnItemClickListener(new AdapterView.OnItemClickListener() {
    @Override
    public void onItemClick(AdapterView<?> adapterView, View view, int i, long l) {
        BtInfo info = mDatas.get(i);
        //好友mac地址
        MainActivity.FRIEND_MAC_ADDRESS = info.getAddress();
        //显示提示对话框
        final AlertDialog.Builder dialog = new AlertDialog.Builder(getActivity());
        dialog.setTitle("连接");
        dialog.setMessage("名称:" + info.getName() + "\n" + "地址:" + info.getAddress());
        dialog.setPositiveButton("连接", new DialogInterface.OnClickListener() {
            @Override
            public void onClick(DialogInterface dialogInterface, int i) {
                mBluetoothAdapter.cancelDiscovery();
                mBtnStartSearch.setText("重新搜索");

                //连接后,跳转到会话页面
                MainActivity.mType = MainActivity.Type.CILENT;
                //viewPager 显示第二页
                MainActivity.mViewPager.setCurrentItem(1);
                //通知 ChatListFragment 刷新信息
                EventBus.getDefault().post(new EventMsg(1));

                dialogInterface.dismiss();

            }
        });
        dialog.setNegativeButton("取消", new DialogInterface.OnClickListener() {
            @Override
            public void onClick(DialogInterface dialogInterface, int i) {
                MainActivity.FRIEND_MAC_ADDRESS = "";
                dialogInterface.dismiss();

            }
        });
        dialog.show();
    }
});
3.4 创建蓝牙socket
由于socketd的操作会阻塞线程,这里在子线程中进行创建。BluetoothSocket 客户端线程:
// 客户端线程
private class ClientThread extends Thread {
    public void run() {
        try {
            mSocket = mDevice.createRfcommSocketToServiceRecord(UUID.fromString("00001101-0000-1000-8000-00805F9B34FB"));
            Message msg = new Message();
            msg.obj = "请稍候,正在连接服务器:" + MainActivity.FRIEND_MAC_ADDRESS;
            msg.what = STATUS_CONNECT;
            mHandler.sendMessage(msg);

            mSocket.connect();

            msg = new Message();
            msg.obj = "已经连接上服务端!可以发送信息。";
            msg.what = STATUS_CONNECT_SUCCESS;
            mHandler.sendMessage(msg);
            // 启动接受数据
            mReadThread = new ReadThread();
            mReadThread.start();
        } catch (IOException e) {
            Message msg = new Message();
            msg.obj = "连接服务端异常!断开连接重新试一试。";
            msg.what = STATUS_CONNECT_SUCCESS;
            mHandler.sendMessage(msg);
        }
    }
}
创建蓝牙连接时需要用到UUID,如需查看更多UUID,请点击这里。BluetoothServerSocket蓝牙服务端socket线程:
 // 服务器端线程
private class ServerThread extends Thread {
    public void run() {
        try {
            // 创建一个蓝牙服务器 参数分别:服务器名称、UUID
            mServerSocket = mBluetoothAdapter.listenUsingRfcommWithServiceRecord("btserver",
                    UUID.fromString("00001101-0000-1000-8000-00805F9B34FB"));

            Message msg = new Message();
            msg.obj = "请稍候,正在等待客户端的连接...";
            msg.what = STATUS_CONNECT;
            mHandler.sendMessage(msg);

            /* 接受客户端的连接请求 */
            mSocket = mServerSocket.accept();

            msg = new Message();
            msg.obj = "客户端已经连接上!可以发送信息。";
            msg.what = STATUS_CONNECT;
            mHandler.sendMessage(msg);
            // 启动接受数据
            mReadThread = new ReadThread();
            mReadThread.start();
        } catch (IOException e) {
            e.printStackTrace();
        }
    }
}
启动蓝牙客户端和服务端线程方法如下(详情参见类的onEventMainThread方法):
if (MainActivity.mType == MainActivity.Type.CILENT) {
    String address = MainActivity.FRIEND_MAC_ADDRESS;//蓝牙地址
    if (!TextUtils.isEmpty(address)) {
        mDevice = mBluetoothAdapter.getRemoteDevice(address);
        mClientThread = new ClientThread();
        mClientThread.start();
        MainActivity.isOpen = true;
    } else {
        Toast.makeText(getActivity(), "address is null !", Toast.LENGTH_SHORT).show();
    }
} else if (MainActivity.mType == MainActivity.Type.SERVER) {
    mServerThread = new ServerThread();
    mServerThread.start();
    MainActivity.isOpen = true;
}
3.5 读取和写入数据
这里主要是通过获取输入输出流来读取和发送数据,以读取数据为例,如下现读取数据线程代码:
// 读取数据
private class ReadThread extends Thread {
    public void run() {
        byte[] buffer = new byte[1024];
        int bytes;
        InputStream is = null;
        try {
            is = mSocket.getInputStream();
            while (true) {
                if ((bytes = is.read(buffer)) > 0) {
                    byte[] buf_data = new byte[bytes];
                    for (int i = 0; i < bytes; i++) {
                        buf_data[i] = buffer[i];
                    }
                    String s = new String(buf_data);
                    Message msg = new Message();
                    msg.obj = s;
                    msg.what = 1;
                    mHandler.sendMessage(msg);
                }
            }
        } catch (IOException e1) {
            e1.printStackTrace();
        } finally {
            try {
                is.close();
            } catch (IOException e1) {
                e1.printStackTrace();
            }
        }
    }
}
3.6 关闭连接
主要是关闭各个线程和关闭socket。
至此,整个蓝牙同信已经完成,测试时需要两个手机,一个座位服务器,一个作为客户端,实现他们间的通信。


